Friday, August 31, 2018

Shabby Chic? Altered Dessert plate!

Hiya! Happy Friday! Today I am gonna show you how I designed this dessert plate! Project for My Rusty Crown DT


Well your gonna need a plate LOL I didnt prep it at all but, you totally could add texture with a stencil or crackle pastes!


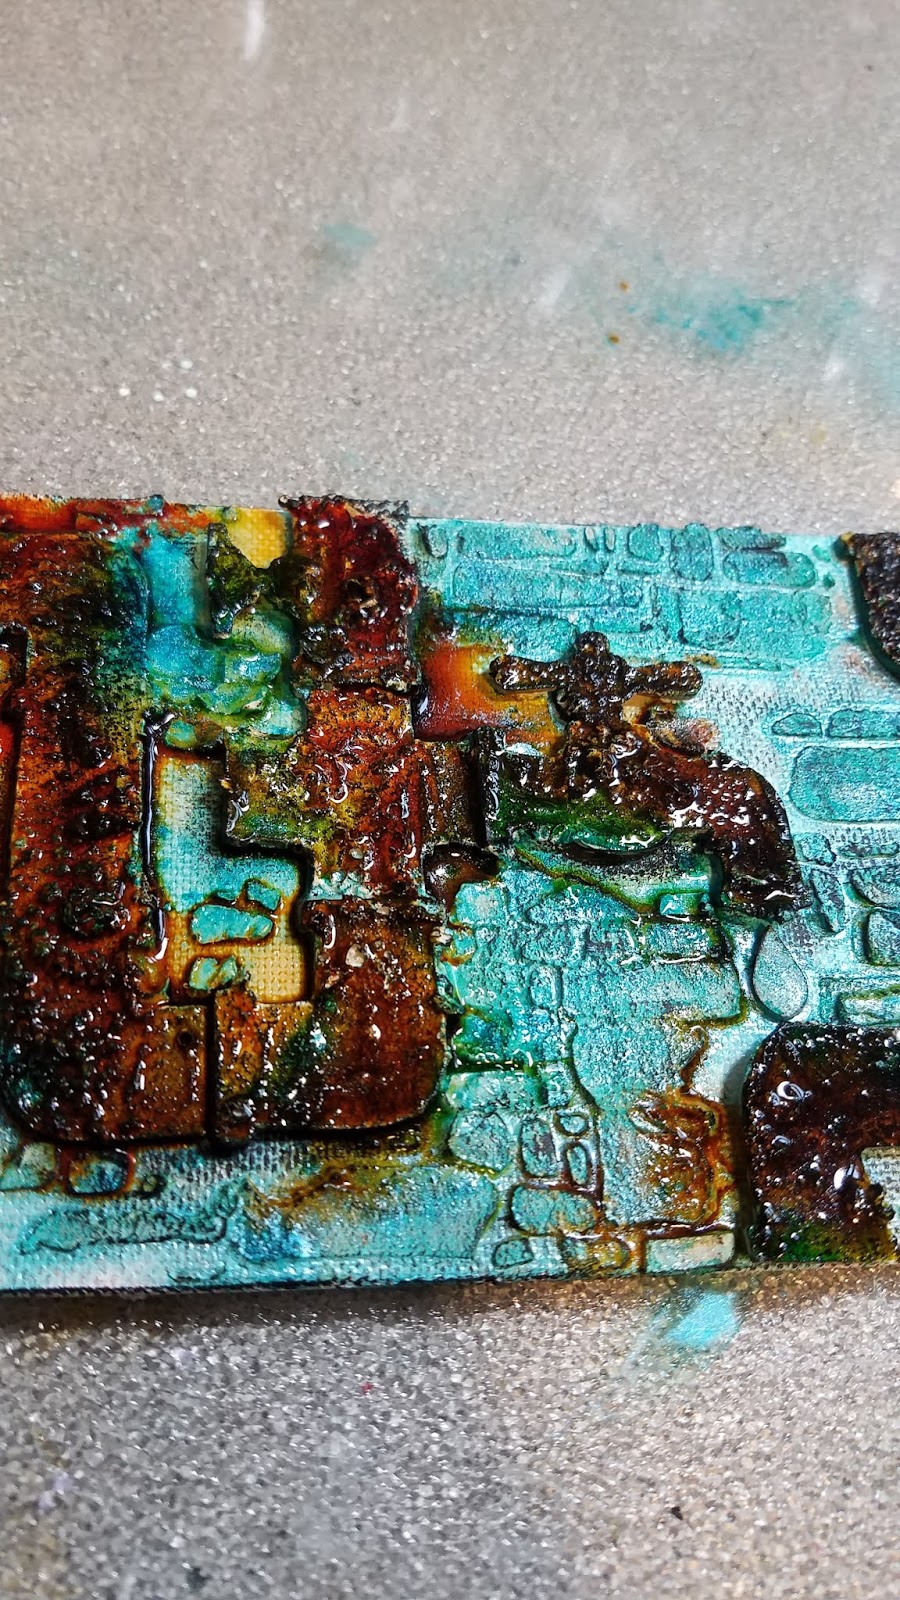
So I got out all my embellishments,my main ones at least, I coated my Prima resin pieces with clear gesso and went about gluing them down with heavy Body Gel.


I used Cosmic Shimmer Shimmer Shakers in colors (Delicate Blossom) (Rich Wine) (Grass Green) and (Bright Sunshine). These little jars have a shaker top, so easy to sprinkle on.. After I Sprinkled my colors I lightly sprayed them with water and dried with a heat gun, I did each color separately.


Here Is what It looked like right after drying, I purposely shook some on the other side of the plate for a cute splatter effect. I Took a dry brush and dry brushed  on some white gesso to bring all of the texture to the surface. I then added (Blush Haze) Holographic Glitterbitz  and Prills in ( Coral See). for the last added touch I took (White Gold) Prima Finnabair Metallique wax half way around the edge of the plate.


Done! 


XOXO - Nicole Palos
Find me on Instagram HERE
Facebook HERE
My Art FB page HERE

Monday, August 20, 2018

Message in a bottle

I made this Bottle to enter in the Lindy's Gang Challenge I didn't have the exact colors so I improvised with what I had and tried to lighten them up with gesso LOL.
If you want to enter the Challenge this month or any month to come the link for all the info is HERE


Hi! Happy Monday to everyone! I have had this idea In my head for a while. When I woke up yesterday morning it just would not leave my mind. So I took my behind up to my local dollar tree and purchased this oil bottle for $1. I took out the spout and replaced it with a cork and on I went to start my creation!


I started off with taking some sheet music and torching it with my heat tool. I then rolled it and added a remnant rub on message from Tim Holtz (Life Quotes) then tied it with string. The bottle I used some Grainy Texture Paste from Little Birdie Crafts through a stencil. I also added Little Birdie Mixed media sand and mixed media stones in the bottle mixed in with glitter, mica flakes and small sea shells.


Next step I added some cleat Gesso around the bottle,leaving the message area clean. I added moss in brown and green, I used some resin coral and a mermaid tail,using Finnabair heavy gel to glue them on. I Used Pentart expand paste on the coral. brushing on the expand paste with a brush and heat setting it adds tons of texture to the coral!


Here I took mica powders Finnabair art stones in all sizes and soft gel and mixed it all up. Adding it all over the bottle. I added on more shells and coated them all with clear Gesso.


Now for my most favorite part! COLOR! I used Lindy's Stamp Gang Starburst sprays in (Shabby Turbine Teal) (Delphinium Turquoise) (Time Travel Teal) (Rusty Lantern) Moon Shadow Mist in (Treasure Island aqua) and Little birdie Color Splash in (Gold Rush) and (Grape Crush). spraying colors and misting with water helps the colors blend nicely together!


After your colors are super good and dry. I took white Gesso and dry brushed all the elements to help define them better and to give a nice pop! I added Prills in (Spruce Willis) Cosmic Shimmer Glitterbitz in (Spring Fever) and (Mermaid Purple). ANNNND DONE! 


Thanks for stopping in to check it out! Link below for the Lindy's sprays used in this Creation!


Links to Lindy's Stamp Gang for the colors used!


XOXO- Nicole Palos


Sunday, August 19, 2018

Rusty Pipes

   HI!  Happy Day! Today I wanted to Show you all the Pentart Expand Paste and how I used it to rusty up these pipes.  if you dont have Finnabair rust pastes here is another option for you! 


 I started off with gluing down my chipboard with gel meduim


in this picture you see where I took a palette knife and spread on the paste with a thin layer, I mean very this you dont need very much.


Now you heat set it with a heating tool, its bubbles all up and turns white in just seconds! Now look at all that texture it has left me with! perfect for rusty pipes! I also added some stenciling with the Little birdie (Brick wall) 


after the panel was completely dry I started adding my colors this is such a beautiful shade of blue. Electric Blue Cosmic Shimmer Shakers, I sprinkled it on and spritzed it with water. 


after that is  good and dry I dry brushed some black gesso went along some of the edges for a drop shadow and to add some depth.


Now I sprayed the pipes with Little Birdie color splash in (Paprika) PERFECT rusty color spray!


I heat set it again with my heat tool. Loving the spilled spray around the pipes give a great rust look!


 I just adding my finishing touches some Tim Holtz quotes, some finnabair was in (Copper) and inked archival around the edges. Oh and Prills in (Third Place).
XOXO-Nicole


My Rusty Crown

Today I'm showing you how I created this rusty crown, I wanted to make something for our beloved Martina! I wanted something to say thank you! she has made a place for us to shop and make friends! My rusty crown inspiration FB group is such a great place, we can share our day to day activities our art of the day or something we made years ago. The people in this group are amazing and that is a reflection of martina! anyway enough of the feels. LOL hope you all like it!


Starting off with some cardboard,Using  heavy gel medium and some clips I started to make my basic shape ,and the clips kept it together for me


         So now I have the basic base, leaving it to dry for a couple hours.


So this is how it was assembled, I took  10 min resin and some silicone moulds ,taking the resin out before it was fully cured still gives it some time before it hardens all the way up. then I took anything heavy to hold it there for a couple more mins till it hardened all the way. now sinse then I have figured out you can heat already cured resin with a heat gun and it becomes soft and pliable again.


So I added all my resin and goodies gave it a coat of black gesso and started using my rust paste. for this I used a sponge dapper .


Using all three colors from Finnabairs Rust Effect Pastes.


finishing touches I used the mint colored rust paste for a little dry brushing, then I added the Prima Finnabair  rose gold wax to give that pink undertone to represent  Martina and her shop! I made a bee out of metal and plush wings and added a charm. (The Queen Bee). Hope you all like it.


Please Feel free to join us on Facebook @ My Rusty Crown Inspiration or on Instagram!
XOXO - Nicole Palos


Stampotique Altered Vinyl Record

Hello! Hi!  Today I'm showing you my process on altering this Vinyl Record.

I start by using a Stamperia stencil and modeling paste


 I get all my bits and bobs out and give them all a good layer of white Gesso
I'll have the links below with everything I used,the foliage is from a Tim Holtz die set. 


Now I start my composition by gluing it all down with gel medium.


                                         Now for Color!!!! Its always my most favorite part!


I went super colorful with this one! I used Dylusions some  Cosmic Shimmer Shakers and Tattered Angels color wash


Now here I add white dry brush. When your using colors that are water reactive you really need to make sure the whole thing is super dry!


I added Oh Jackie and then some white splashes and call her done!


XOXOXO - Nicole Palos

Artist Trading Coins

Artist Trading Coins with Visible Image and Stampotique

I used a die cutting machine and cut my watercolor paper and an old cereal box for the back. These coins are 2.5 inches around.


I used Cindy Seahorse and black embossing powder,Next I used my Nuance powder. just a sprinkle of these powders and a spritz of water and you can make custom watercolors!


I did the same thing for my Coins! spritzed with water and water colored them! these powders are so very vibrant! I then took distress ink and some Tim Holtz stencils and added some more design to the backrounds!


Using Black ink I  took it all around the edges of the coins and my images.


Glued them down with some gel medium and started my doodling with a white gel pen.


 Added some Tim Holtz quotes more doodling and thats all! Links for products used down below.


Thanks for Looking! XOXO - Nicole


Deep Sea Diver Gear

Deep Sea Diver Gear With Crafting On A Budget (Mai Larsen) I Got the Stamperia Sea world paper from Crafting on a budget I started by Cuttin...